HAND FEEDING
Kristen Reeves, Meadowlark Farms Avian Supply, Inc.
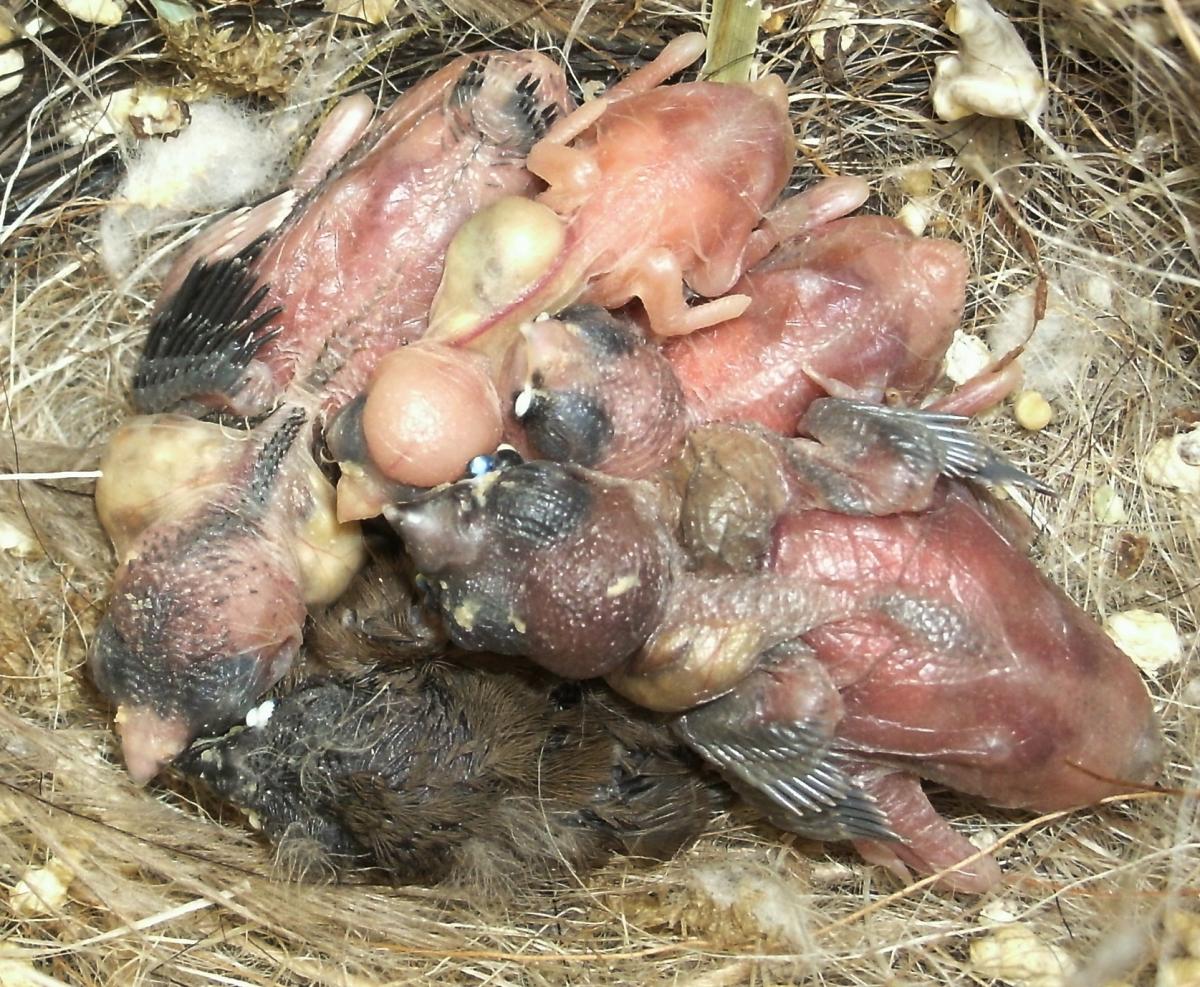
Your adults have abandoned the chicks. You do not have foster parents set up...what can you do? Hand feeding chicks is time consuming, but the rewards are great!
A WORD ABOUT HAND FEEDING:
If you choose to hand feed, you'll want to know a few things first. Like a human newborn, baby birds need to be fed on a regular schedule. Unlike a human newborn, baby birds need to be fed much more often - like every 20-30 minutes for the first few days! You will have to prepare yourself for long busy days if you are serious about saving your chicks. A parent-raised Gouldian chick will not leave the nest until it is about 22 to 25 days old! It will not be feeding itself exclusively until it is about 40 to 45 days old! A hand-fed chick will take MUCH longer to achieve each milestone. It will be reliant on you until it is able to feed itself, drink water from a watering device, and fly well. If you want the chicks to survive, you must prepare yourself for a long journey and be extremely vigilant!
DECIDE TO DO IT RIGHT!
 My first experience with hand feeding was a traumatic one. I had read up on how to do it, and diligently watched, fed, bathed, and cared for my young one. I even carried him around with me on long road trips, making sure he was warm enough and fed when necessary! My mistake came when, in a hurry, I tried to feed him too quickly. He aspirated (breathed in) the food, and essentially drown in the food I had given him. In essence, he choked or suffocated to death. I was devastated. I had spent a full week carefully caring for this poor little guy and he was even beginning to get a few pin feathers on his wing tips! His eyes were just opening and he knew I was his "mom"! And in my hurry, I killed him. From that moment on, I swore I would never lose another chick to stupidity or haste.
If you are going to hand feed, you MUST make the decision to do it right! You cannot be in a hurry, and you MUST care for the chick with slow diligence!
You may want to keep the following items on hand:
-
Baby bird formula- I prefer “Vetafarm's Neo-Care” because it is super smooth and the chicks do exceedingly well on it. There are many good products on the market, but after testing them all, I prefer the Neo-Care. For an average clutch of 6 chicks, you will use approximately 1-1/2 containers of formula by the time they are fully weaned, sometimes more depending on the species.
-
Fresh water and a water cleanser such as KD Cleanser and Megamix to lower the pH of the water you use to mix the formula. This inhibits bacteria in the formula and yeast growth in the chick’s crop.
-
NOTE: Never mix formula with KD for more than 2 days in a row!!!
-
NOTE: Never mix formula with KD for more than 2 days in a row!!!
-
Several 1cc syringes– These syringes should be fitted with a crop tube or cannula tip for the first week or so. It is easier to feed with a crop tube or cannula at first when their mouths are so tiny! You want more than one so that you can sterilize one while the other is in use. Find our Hand Feeding Syringes here.
-
Small cage or brooder - set up and fitted with a thermometer, heat and humidity source.
- Some type of sterilization method– after each use, soak the utensils in hot water and KD Cleanser, Virkon-S or bleach (choose one, do not mix these products), rinse them thoroughly and allow them to dry completely after cleaning. I keep several syringes and seed cups on hand and set them up for the next several feedings with all of the dry mix, then add the liquid fresh at each feeding. This prevents having to wait for the items to dry in between feedings AND keeps the chick out of harm’s way from bacteria.
BROODER SET UP:
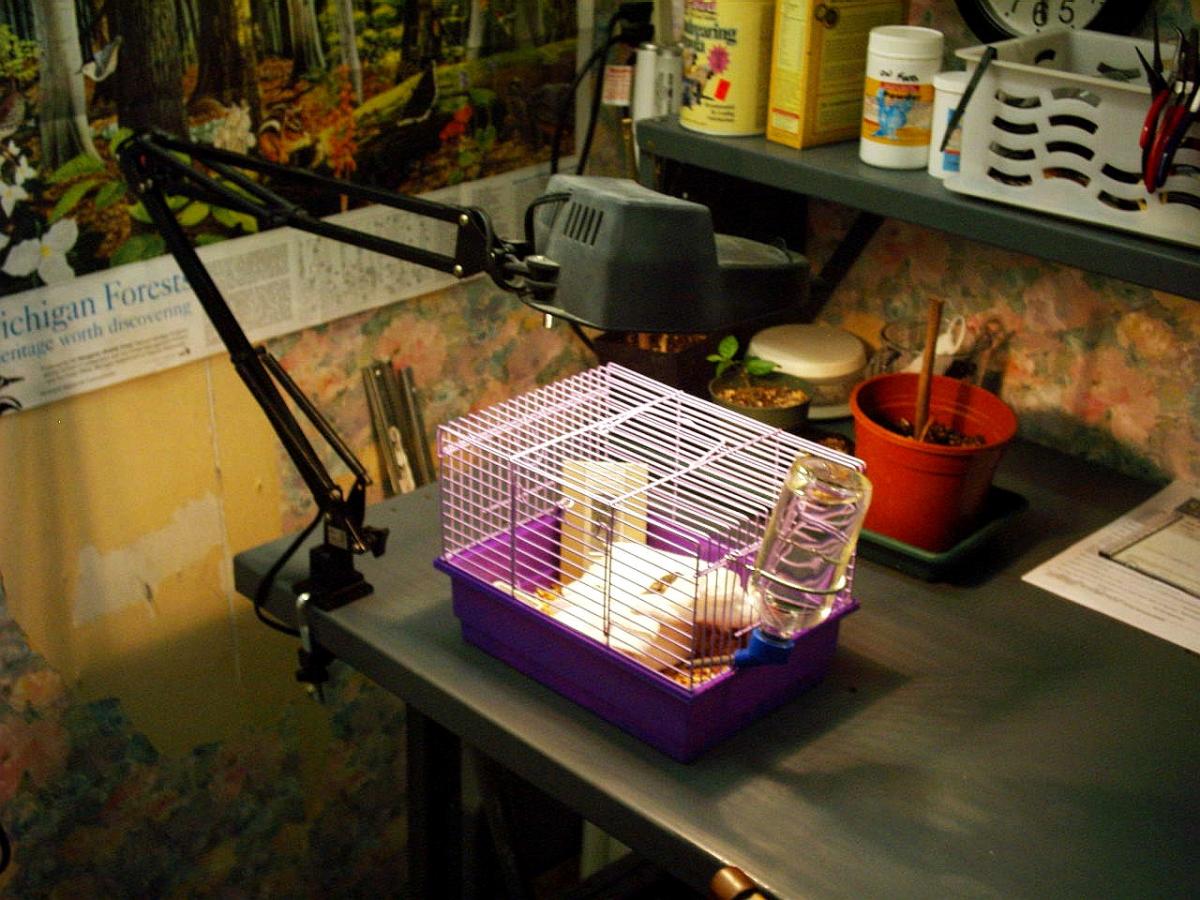
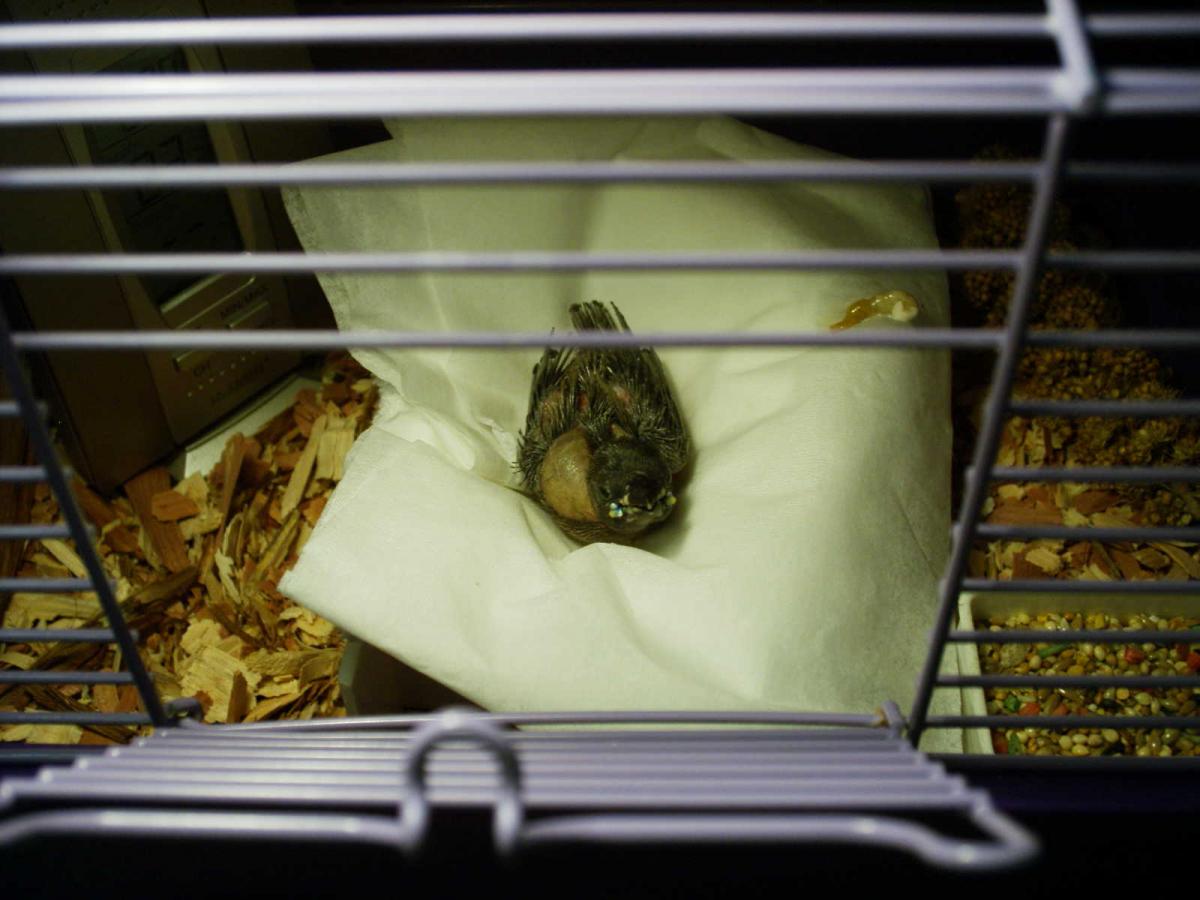
.JPG) There are many ways to set up and care for your hand-fed chicks. I used to use a small cage with a swing-arm lamp or heat lamp fitted with a 25 watt red party bulb. I cover the cage with a towel when not feeding the chick leaving only an end open to allow air flow. I place a thermometer in the cage along with a small dish of water for a bit of humidity. I keep the thermometer right in the cage and placed it OVER the ceramic dish in which the chick(s) reside until they are fully feathered. Doing so allows me to know exactly what the temperature is where they are sleeping.
There are many ways to set up and care for your hand-fed chicks. I used to use a small cage with a swing-arm lamp or heat lamp fitted with a 25 watt red party bulb. I cover the cage with a towel when not feeding the chick leaving only an end open to allow air flow. I place a thermometer in the cage along with a small dish of water for a bit of humidity. I keep the thermometer right in the cage and placed it OVER the ceramic dish in which the chick(s) reside until they are fully feathered. Doing so allows me to know exactly what the temperature is where they are sleeping.
 I’ve also used a small 2.5 gallon aquarium fitted with a reptile substrate heater, then a trouble lamp fitted with a red 25 watt party bulb for heat. A small dish of water with a sponge in it allows for optimal humidity. The drawback to using this setup is that airflow is less than optimal. The aquarium can easily overheat in an instant unless there is an adjustable thermostat on your substrate heater. Sometimes the substrate heaters don’t get hot enough to give enough warmth, and sometimes the trouble lamp can be just a tad too much heat when paired with the substrate heater. There is very little to be done about adjusting the heat in this setup.
Regardless of chosen setup…
My chicks are placed in a ceramic ramekin which is first lined with nesting fibers (not grass), then with tissue paper that is easily changed at each feeding. The nesting fibers insulate the chicks from direct heat from the ramekin (they sometimes get TOO hot and can burn the tender flesh of the chicks). The tissue allows me to change the nest quickly and easily.
Initially, I keep the heat at about 85 to 90 degrees. As the chick feathers up, I lower the temperature by increments. Once the chicks are feathered, I replace the ceramic dish with a plastic one. At about day 12, I place a small dish of seed, a piece of spray millet and a tube type watering device in the cage so the chick gets accustomed to them.
 Once fully feathered, I keep their temp no at more than 78 degrees which I will maintain until the chicks fledge in another 6 or 8 days. If the cage is too hot, you’ll see the chicks pant. If it is too cold, they will not assimilate the formula in their crops even once feathered.
As soon as the cuticle has left the feathers they are able to fluff themselves, I will remove the heat and allow them to adjust to the bird room temperature which runs between 65 and 75 degrees depending on the temperature outside.
At this point (day 12-20) they should be actively preening.
FORMULA TEMPERATURE:
The key to feeding a chick at this age is to keep the CHICK warm, not necessarily the formula! It isn't warm formula that makes a chicks crop function properly, it's a warm CROP!!! If the chick is too cool, his crop won't be able to process what is put in it and may become impacted. Keeping the chick warm is imperative.
After hand feeding hundreds of chicks here, I’ve declared formula temperature and the need to mix formula fresh at each feeding to be something of a myth. If you want to err on the side of caution, mix it fresh each feeding. However, I mix the formula fresh each MORNING, but by the time it has been allowed to sit long enough to absorb all the water it can hold it has almost entirely cooled. Most formulas MUST sit for at least 10 minutes in order to fully absorb the liquid used to mix them. Neglecting to allow the fluid to be absorbed can cause problems such as an over-expansion of the formula or a hardening of the formula in the crop causing an impaction. Both of these issues can kill the chicks. Because of this, I just feed the formula at room temperature and have NEVER had an issue. As long as the CHICKS are warm, they will be able to process the formula just fine. This makes monitoring the temperature of the holding cage even more important.
I leave the unused formula covered in my prep area until the next feeding - BUT - my prep area stays at a fairly consistent 58-60 degrees and is dark and cool. You do not want the formula to spoil, so if your room is any warmer than this, it is best to mix the formula fresh at each feeding. Spoiled or nearly "gone-over" formula can make you chick sick or even kill it.
CROP FEED VS MERELY DROPPING INTO THE BEAK:
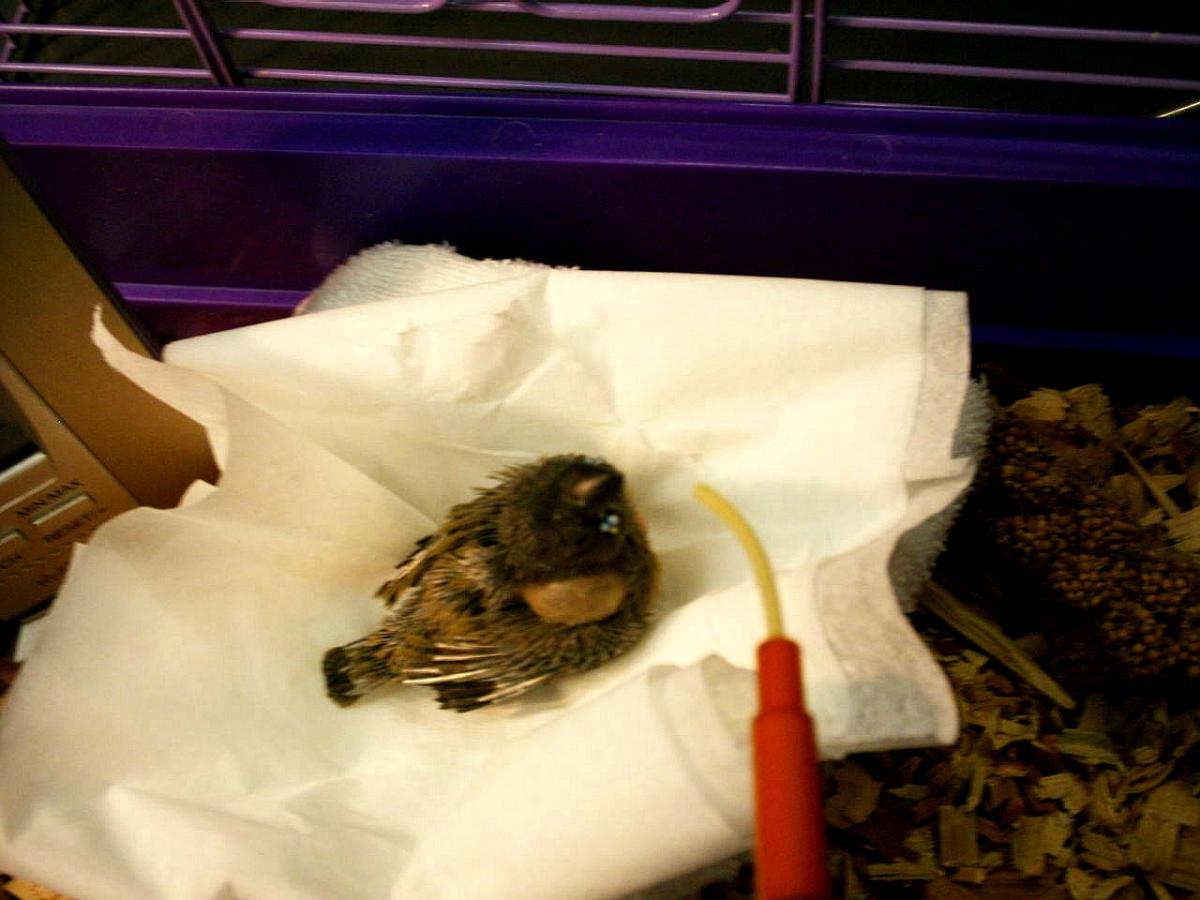
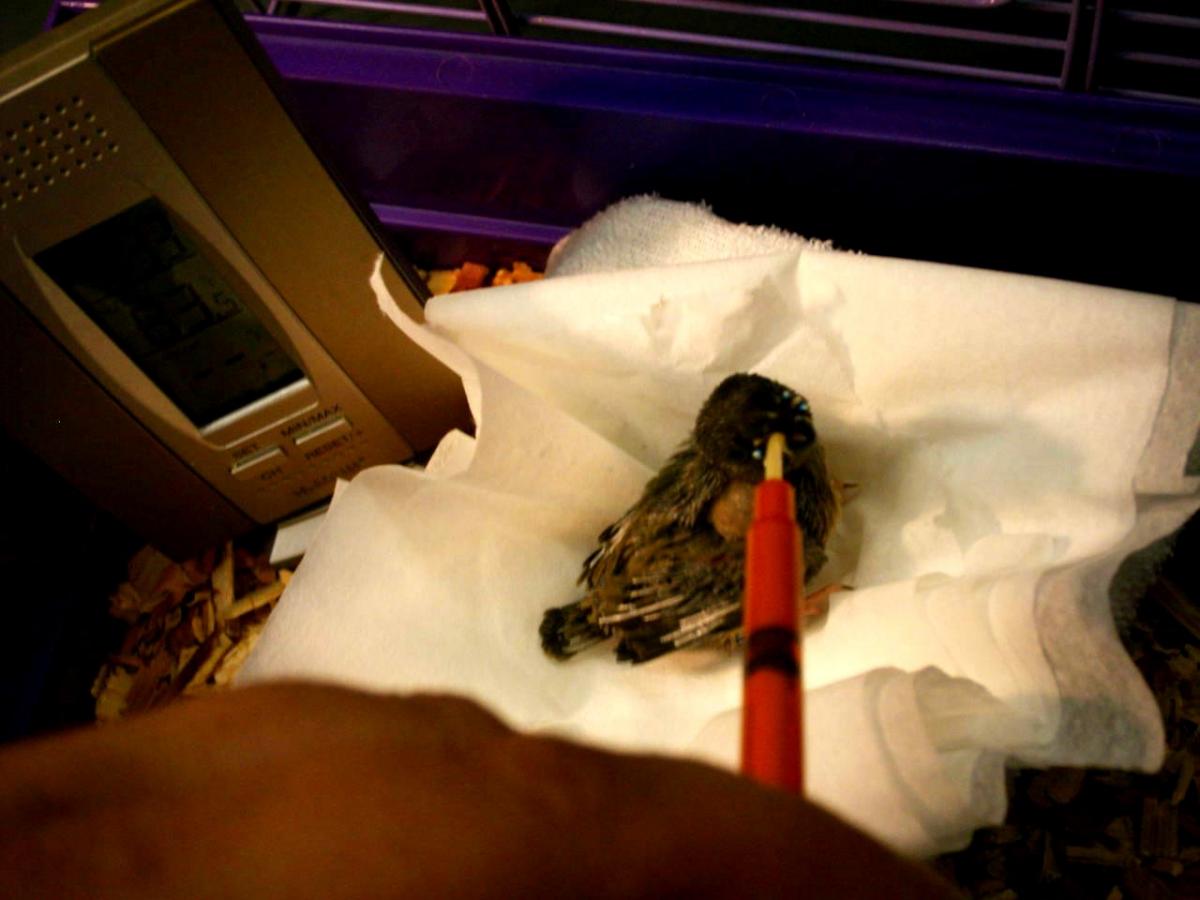
I prefer to “partially crop feed” unless the chick is in dire need of immediate food. Direct crop feeding would mean inserting the tube directly into the crop and administering the formula.
I say "partially crop feed” because I do not allow the crop tube to totally enter the crop, just meet the very opening. Because finch chicks are so small, crop feeding is very tricky and can be potentially dangerous. I have to be extremely careful when feeding the chick so as not to rupture the crop or choke the chick. Eager chicks will rise up to the crop tube, potentially cramming it down their own throat and injuring the delicate crop lining. In a serious case, the crop could be torn or damaged enough that it will no longer function properly.
Always test the force of the plunger on the syringe before attempting to feed the chick. I have many syringes and all of them have a different tension on the plunger. Syringes fitted with a clear crop tube are created for use in the very first days after a chick has hatched. The fine tube allows for FINELY mixed, thin and wet formula to be brought up into the tube. They are not made for thicker formula that is meant for older chicks. If you do not test the plunger and formula thickness with the tube before administering, you could find the tube shooting off the end and into the chick if too much force is used. Cannula tips work well for slightly older chicks up to weaning age. However, I still make sure to test them first. One may come out very fast, while another may take some effort to depress the plunger.
HOW MUCH?
When first feeding, a newly hatched chick will only take a very small amount of food, literally a mere few drops because its crop has not yet expanded to full size. Because you must feed very slowly, it can take a while to feed a newly hatched chick. Sometimes by the time you are done feeding, have cleaned the chick and the utensils, it will be time to feed it again!
NOTE: If you are feeding more than one clutch of chicks, you should use a different syringe for each clutch, or sterilize the syringe between feeding each clutch to avoid spreading any bacteria or infections between the chicks.
If the chick has been tossed or abandoned, I look carefully at its stomach. If I can see a yellow ball (yolk sack) through the skin, I will only feed a very thin, watery formula (approximately 5% solids) until the yolk has been absorbed. At this point, you only need to mix about 1/2 tsp of formula per feeding – just enough to bring up into the syringe. You will add approximately twice as much fluid or slightly more. The chick won't eat this much, but it allows you to pull the formula up into the syringe. This very thin formula keeps the chick hydrated, but forces it to use up the yolk.
I offer this mix every hour or so for the first two days or until the yolk sack is gone. You must be certain the yolk sac is used up before feeding the chick a thicker formula. Also, when you ARE feeding the chick thicker formula, be sure the crop is empty or nearly so before giving the chick more.You may need more or less, depending on each chick.
To hand feed:
-
Load the syringe with formula - be sure not to allow air to enter the tube.
-
Gently tap the chick’s beak so it will open its beak.
-
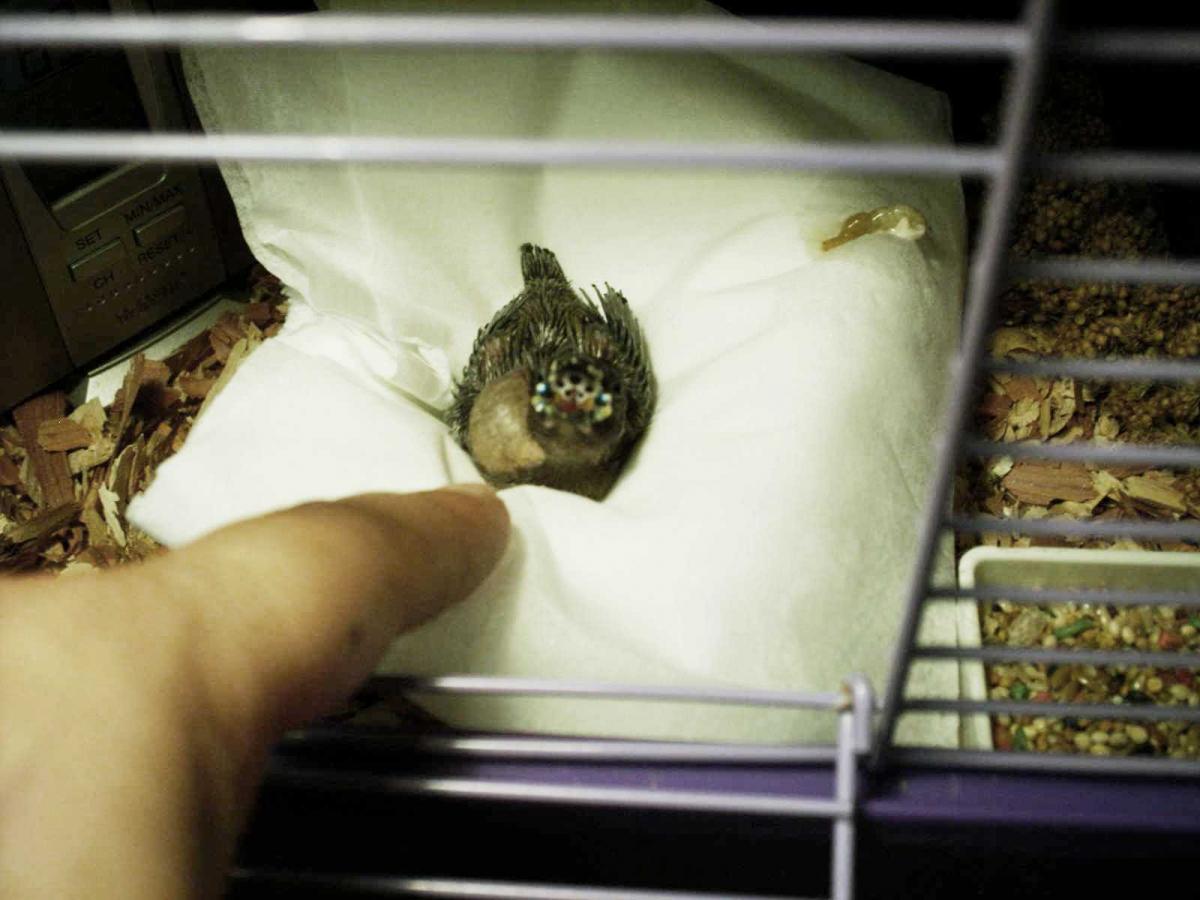
VERY slowly and gently insert the crop tube into the chick’s beak and depress the plunger on the syringe to deliver the formula. If you give too much too fast, the chick can choke or aspirate (inhale) the food. Aspiration can kill the chick in mere seconds. Do not allow the tube to go in too far! You can severely injure the chick!
- Watch the crop. In the first few days when you can see the crop begin to expand a small amount the chick should be done eating. Its crop will expand larger and larger with every passing day and the chick will be able to eat more - you must NOT overfill the crop or over feed the chick, but you must be sure you've given enough formula! Overfilling the crop can cause irreparable damage. Pay very close attention to the crop and how it expands.
It will take the chick a few minutes to realize it has been fed and it will continue to beg. DO NOT BE TEMPTED to give the chick more if its crop is full! In addition, as the chick gains feathers, the crop will be less obvious (hidden under the feathers), so you will need to pay very close attention!
-
When finished feeding, be sure to wash and sterilize all utensils and anything you used to prepare or store the formula.
-
Bathe the chick. Use a cotton swab dampened with warm water to wipe away any formula that may have gotten on the chicks face or body, paying close attention to the nodules on the side of the beak. Formula gets easily stuck in between these. If you do not clean around these nodules, the skin around and between the nodules may become irritated and infected. Formula may harden making it almost impossible to remove. If you are gentle, you need not worry you will harm the chick.
- Change the tissue under the chick. Droppings will have accumulated, and chicks shake formula all over the place when you feed them. The tissue needs to be changed frequently to keep the chick and its environment free from potentially harmful bacteria.
FEEDING THE CHICKS - DAY 3 TO ABOUT DAY 7:
I feed the baby a slightly thicker formula (about 15% solids). Keep an eye on the consistency. You want to make sure there is enough fluid to keep the chick hydrated, yet not so much that it isn't receiving enough nutrition. At this stage, the chick will consume approximately 1 tsp of prepared formula per day. Again, this may be more or less depending on the chick and the species.
The mixture must still be thin enough to come up the syringe, but not so thin that the baby isn't getting enough nutrition at each feeding. These feedings usually take place every 20 to 30 minutes throughout the day. The only time I do not feed on this schedule is if the crop has not emptied completely or almost completely before the next feeding.
FEEDING THE CHICK - DAY 8 AND BEYOND:
The chick will gradually need more formula and you may now thicken the formula so that it lasts longer in its system. You want to have a 28% solids mix. Just be sure to keep it wet enough to keep the chick hydrated and so that it still comes up in the syringe. I have attempted to add ground seed to the formula at this stage but have not been successful at getting the chicks to accept seed before the age of 23 days. They spit the ground seed out!
If you choose to add ground seed, be sure you grind it very fine and remove ALL husks. You may have better luck than I have!
At this point I feed every 1 to 2 hours though I keep a close eye on their crops - when empty, it's time to feed! You also want to band your chicks. Sometime between 7 & 9 days the chick will be big enough that the band won't fall off, yet small enough to get a closed band over his foot. Chicks grow very quickly over night, so keep a close eye on their size if you intend to band with closed bands. If the chick is too large, you won't be able to get the band over the foot.
At the 10-12 day mark, the chicks will have the beginnings of pin feathers. Day 12 is when I place a small dish of seed and some spray millet in the cage so the chicks can get accustomed to it.
 By day 16 I am feeding the chicks every 2-3 hours, still keeping an eye on them to make sure they are getting enough.
I weigh my chicks every other day and have noticed that they usually go through growth spurts every third day or so.
The chick will beg for more food and you can generally increase the amount you give as its crop will have also expanded.
***NOTE: You may adjust the amount given at any point during the duration of hand feeding, just be sure the crop has emptied each time and you DO NOT over feed or over expand the crop!
Rule of thumb – do not extend the crop beyond the size of the chick’s head. Doing so may injure the crop or cause slow crop issues. If you see signs of slow crop, be sure to feed the chick a single feeding of plain water or KD Cleanser (at the drinking water rate). This should clear the crop of excess formula and loosen any formula that may have hardened in the crop between feedings.
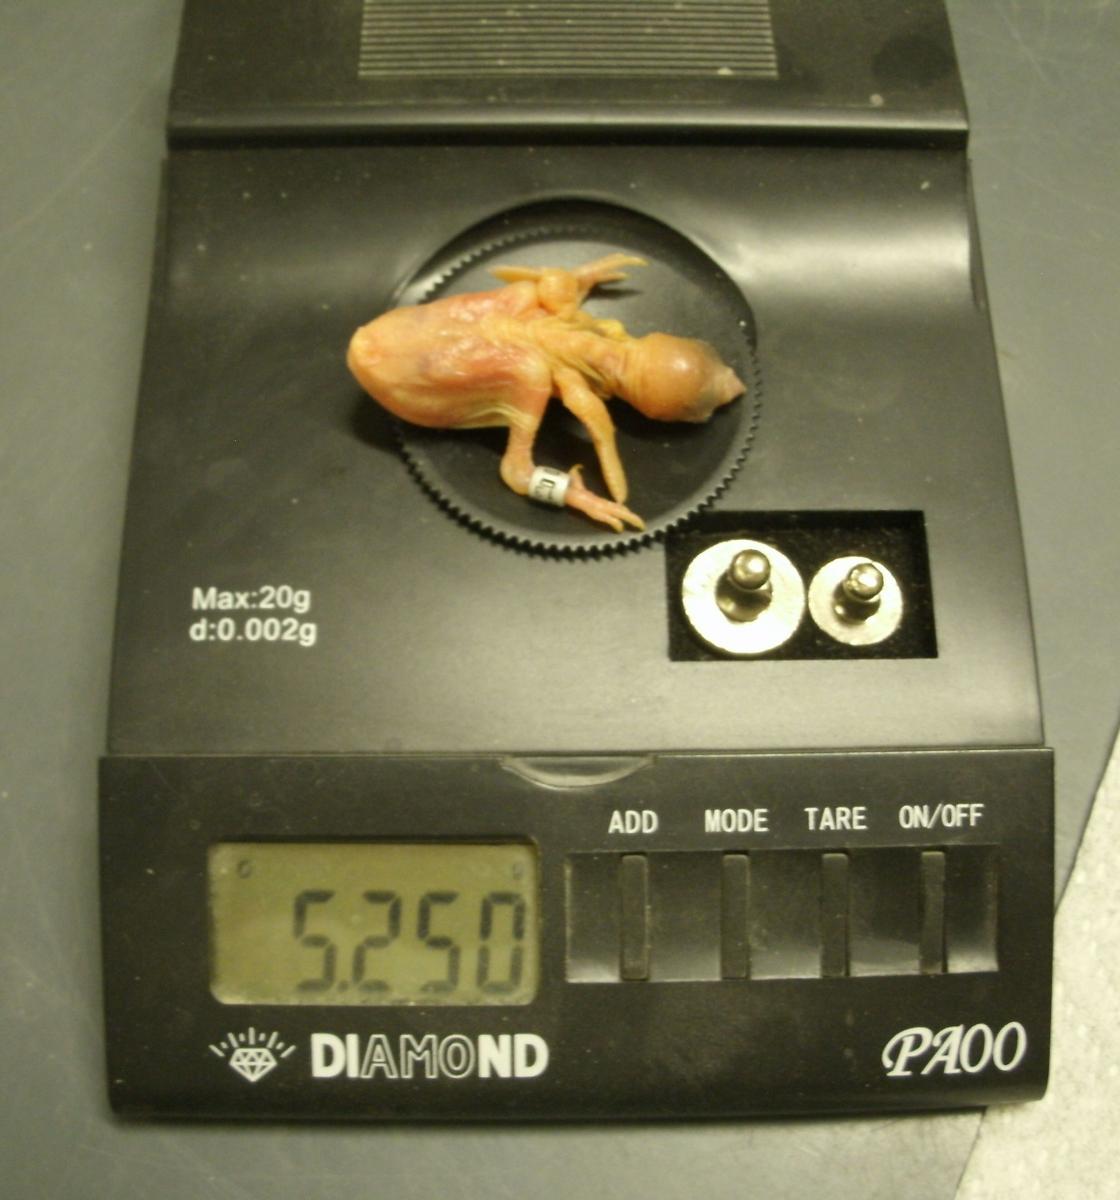
My 16 day old chick pictured above weighs 14.2 grams and eats a full 1cc syringe of formula per feeding, occasionally a bit more. The chick should be ready to fledge (leave the nest) at about day 22 or 23.
FLEDGLINGS:
When the chicks fledge, it does NOT mean you can stop feeding them. While the chicks may take much more feeding at fewer feeding and may now begin to pick at seed and even begin feeding themselves regularly, they will still beg for food and SHOULD be fed until they no longer beg for food from you. Most chicks will just stop begging for food or accepting it from you when they are ready. It’s like a switch was flipped. One feeding they are begging as if they are starving, the next moment they will no longer accept the syringe and being eating on their own entirely.
WEANING:
I typically remove my chicks from their parents when the nodules on either side of the beak begin to diminish. For parent-raised chicks, this happens right around the 45-50 day mark, but you need to pay close attention to your hand fed chick. Hand feds are not typically ready to wean as soon as a parent or foster parent fed chick. If they are still begging, you still need to feed them, and they are certainly NOT ready to be introduced to your flock.
During these days, the chicks will attempt to leave the nest. You should now remove the extra heat and allow the chicks to become accustomed to room temperature. You will also want to keep an eye on them to determine if they need more space to spread their wings and practice flying.
Example -
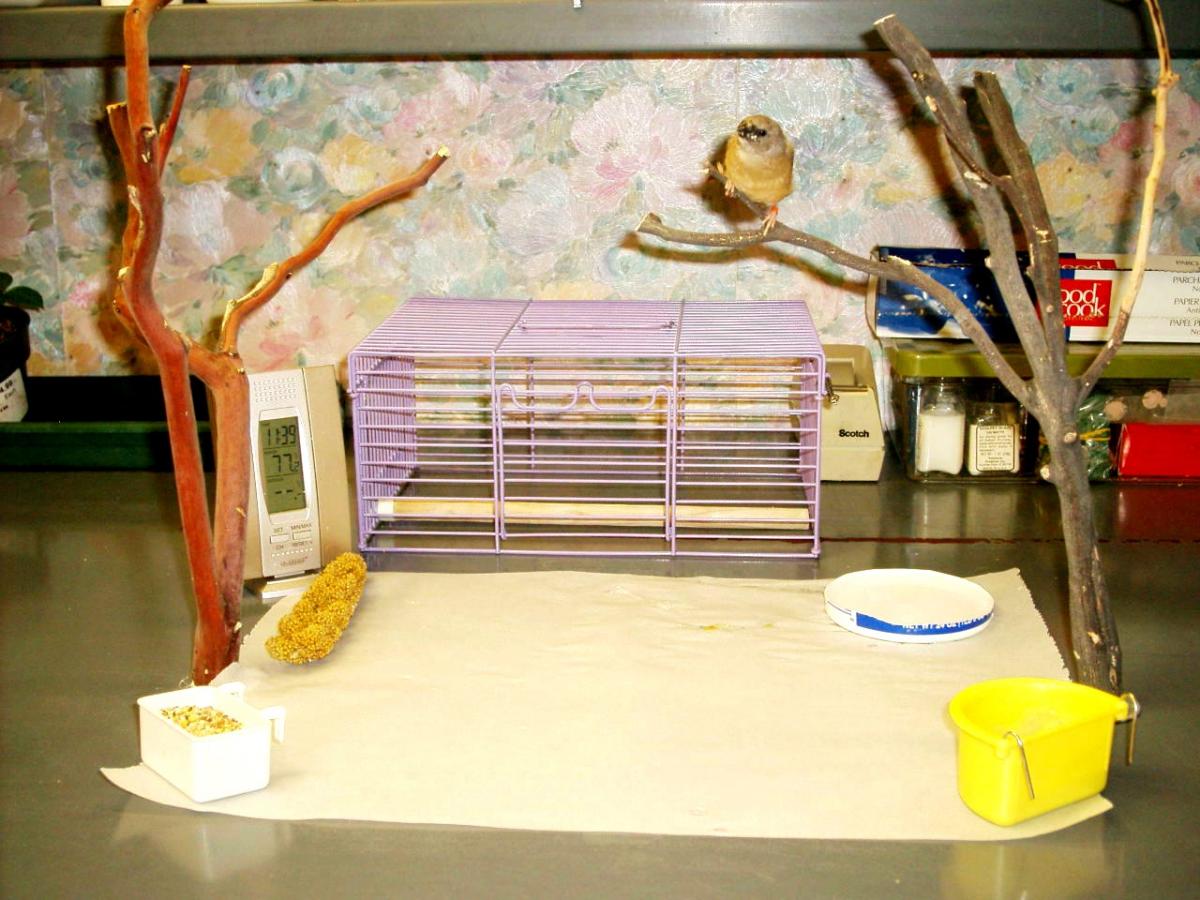
Here you can see Jiggy's playground. I have used two manzanita perches to create "trees" so that my young one can practice flying. It is important to remember that if you allow the chick time out of its cage, you make sure there are no household dangers your chick can be subjected to! My bird room is secure so I allowed Jiggy to fly free, however, he was not allowed out of the bird room. My cat would have had a grand time if she got hold of him!
In this photo, he is 27 days old and eats about 1 1/2 syringes of formula. You can see I still have a thermometer near him, spray millet, a dish of seed, and a shallow dish for water. The yellow dish is dry formula waiting to be mixed for the next feeding.
At age 42 days, Jiggy is still begging for food. I have placed him in a large flight cage with a handful of other young juveniles, but I am keeping a watchful eye. When he sees the other birds feed, he flies down to feed with them...a great start!
I also placed a shallow bowl of bath water in the cage. Jiggy had his first solo bath (meaning I didn't give him one, he did it himself!) He truly enjoyed splashing around in the dish, but was unable to get back out and needed my assistance to get up to a perch. I'm glad I was watching him so closely. I've had young chicks die of hypothermia from being stuck in the bath water too long. I've also had chicks nearly drown because they were really too young to bathe on their own.
Under normal circumstances, he is set up in a large breeder cage so he can practice flying, yet be safe from attacks by the other birds...and because I'm training him not to "buzz the tower" when he's out of his cage! He dive bombs me when I come in the room and I've nearly stepped on him twice! He screams at me because he hates the cage after the freedom, but until he learns not to land on my head, buzz the tower, and play on the floor, he'll have to get used to the cage idea! Every time he breaks a rule (one of the above mentioned issues), I place him back in his cage. He is beginning to get the idea, and soon I should be able to let him out without fear he'll be injured - or one of my eyes will be poked out! At least he comes when he is called now, even if he knows I'll put him in his cage, AND he answers me when I call him. One big bird to one very small bird!
ONCE FULLY WEANED - INTRODUCING YOUR CHICK TO THE FLOCK:
Hand fed chicks are not always readily accepted back into the flock. If you choose to return the chick to the flock, be sure to observe carefully to make certain the other birds do not Attack it or harm it in any way. You may never be able to reintroduce the chick...but that may be alright if you are looking for a companion bird! Because you have lovingly cared for this chick, it will follow you around the house because you ARE its flock! Just remember to keep the bird in a cage at night and be mindful of household dangers (pets, children, open water, closed spaces, etc.), and NEVER allow the bird in the kitchen!
In Jiggy's case, he was being trained to accompany me on my Elementary School presentations. I wanted the school children to see what it's like to hold a bird on their finger, learn about proper pet care, and the joys of owning a bird. Because Jiggy was unlike any other chick I'd hand fed (he was gregarious!), he will be the star of the show! But many children are afraid of animals and Jiggy needs to know he can't fly at them like he does me! He needs to land gracefully on their hand or shoulder, and NOT their heads.
He will probably not reside with the flock entirely. I want him to get used to eating seed with the other birds so he is only with them for short periods at a time. The rest of the time, he resides with my family and is very tame. He loves to flit about my own children...and even hubby has taken a shine to him!
DANGER WILL ROBINSON!!! (WAVING ARMS FRANTICALLY):
I've done a lot of stupid things over the years, but this one takes the prize. "Fourteen" one of my 2011 hand-feds was allowed to fly free in my normally safe bird room since he was old enough to fly. I had always allowed him out of his cage under supervision, but this one time I figured I'd let him stay out and explore while I was away. I came home to find him near death, cold and dehydrated, stuck in a sticky moth trap.
Panic ensured and my son and I spent nearly 45 minutes trying to free him from the trap. We ultimately used diatomaceous earth to cover the sticky part of the trap so it wouldn't continue to stick to new portions of his body, and used the surgical scissors from my necropsy kit to painstakingly cut Fourteens feathers. It was a horrible experience. Fourteen still shows the scars of his accident today.
If you decide to allow your hand-feds to fly free, PLEASE be certain there are NO household dangers. You want to enjoy your little bird for a long time!