Choosing A Microscope
And Terminology
Kristen Reeves, Meadowlark Farms Avian Supply, Inc.
These scope pages are intended for the bird keeper who wants to learn more about what makes their birds tick, what makes them ill, how to identify issues, and learn to perform basic microscopic fecal exams. Remember, even if you learn these skills and use them regularly, they are no replacement for the knowledge and experience of your Avian Veterinarian!
Choosing a Microscope
First things first! My personal preferences for a decent scope and what I feel is the bare necessities for viewing fecal samples and other aviary items.
It has been my experience that in order to truly identify issues in my birds, a microscope of good quality (not a “kid” scope) is necessary. When looking for a scope, you want something that is heavy enough that it will not move or tip while in use. My personal preference is that it have a mechanical stage with clips to hold the slide. A scale is a nice feature to have. It will enable you to make note of where you saw something on the slide and go back to it after viewing other portions.
I prefer a scope on which the objectives MOVE DOWN to the slide with a stationary table, NOT one on which the table moves UP to the objectives. The reason I prefer this is because any movement of a wet mount on the table will make items shift as the table moves, often forcing you to have to search again for the item in question. When the table is stationary, there is much less Brownian Motion to contend with!
Most pathogens we can identify without additional lab equipment will be easily seen with 400x magnification (10x eyepiece x 40x objective). You should consider 10x & 40x objectives – at very least. Anything greater than 40x will make EVERYTHING look like a sea monster! And when you are dealing with a sick bird, sea monsters are NOT something you want to see! Any other objectives included with your scope are nothing more than a bonus! But anything greater than a 100x objective is really not needed until you really have a good handle on what you are looking at and for!
The light source should be self contained and preferably adjustable. My scope has an internal light source with an external “illuminator” that allows me to adjust the intensity of the light both on the scope itself and from outside the scope. This has come in handy on many occasions. While the irises and condenser on the scope allow me to adjust light, the illuminator gives me that extra bit of control over how much or how little light will come through my sample. I’m a control freak.
The more controls the better! 
While not entirely necessary, it is nice to have a dark field option on your scope. This feature allows you to adjust your light so that small and almost perfectly see-through organisms can be seen with enough clarity to identify them. With dark field, instead of passing THROUGH the object, light comes from the sides and illuminates the object giving it an almost 3D appearance. If there is an iris on your condenser, you can use this to imitate dark field.
Terminology
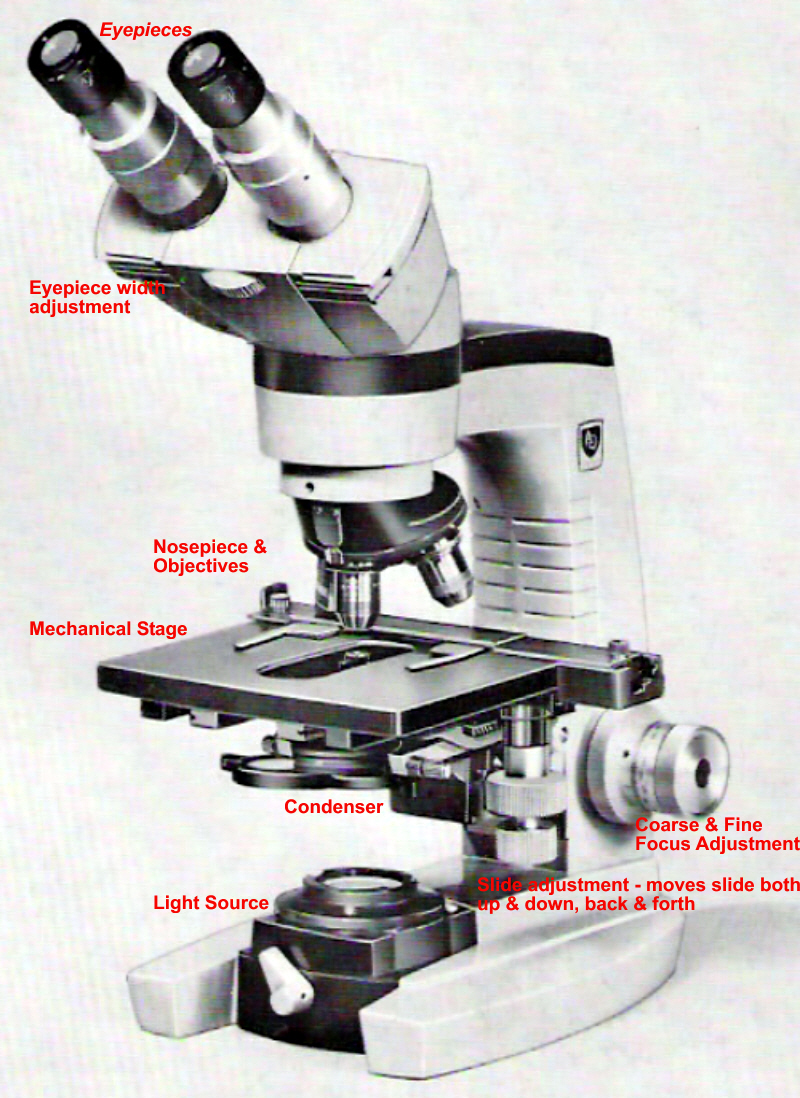
Monocular/Binocular/Trinocular
These phrases represent the number of eyepieces the microscope comes equipped with.
A Monocular microscope has only one eyepiece and is the type found in many high school biology labs. This type of scope will work fine for these procedures, but you will have to close the eye you are not using to look through the eyepiece.
A Binocular microscope has two eyepieces. This is the type of scope I use in my own lab and RECOMMEND! Most binocular scopes are adjustable so that you can adjust the width of the eyepieces to meet the width of your eyes and look through with both eyes at the same time, somewhat like binoculars you’d use to look far away.
A Trinocular microscope has two eyepieces and a tube or fitting for a camera or projector, or sometimes a third eyepiece. These are REALLY nice, but I have found that when using the video or projector functions, the resolution is lacking compared to that seen through the actual scope. Perhaps I haven't seen a “good one”, but for these procedures, either a good monocular or binocular scope will do just fine!
Eyepiece– The eyepiece lenses magnify as do the objectives. Most scopes come standard with 10x magnification EYEPIECE lenses in either normal or wide-field variety. I personally prefer wide field, which is indicated by the letters WF on most scopes. Wide field allows you to see MORE of the slide at one time. Some scopes come with both 10x and 20x eyepieces. There are many times I wish I had a set of 20x eyepieces. MANY times! If the scope you are considering has them, they are a BONUS!
***To determine magnification, multiply the eyepiece magnification by the objective magnification. If your eyepieces are 10x and your objective is 10x, multiply the two - you are viewing at 100x magnification! 10x X 10x = 100x magnification
Nose piece-The portion of the scope that holds the objectives.
Objective-The portion of the microscope that gets closest to the actual slide. There are typically 3 to 5 objectives on a standard scope - they are the cylindrical pieces than hang down just above where you would place the slides.
In reality, we bird keepers will really only use for anything other than a 10x and 40x objective. My scope came with a 4x objective - I have had absolutely no use for the 4x – everything I look at is far too small to see at all with only a grand total of 40x magnification! It also came with a 100x which when combined with the 10x eyepieces = 1000x magnification. I rarely have anything small enough to warrant using that much magnification! The only time I may use it is when I’m trying to determine which specific type of protozoa I am dealing with or to determine the exact shape of the bacteria I see.
- 4x -this objective really doesn't show much other than the undigested plant material and other very large bits. You could use a magnifying glass and see this much! I never use this objective even though my scope does have one.
- 10x -this objective is best used for scanning through the entire slide before zooming in to see a particular item. I will usually scan the entire slide and take note of various items I'd like to take a closer look at FIRST, then go back and view again with greater magnification. Some pathogens are easily seen at this magnification, other smaller ones are not and must be viewed at a higher magnification. Coccidia & worm eggs are usually easily seen with this objective. Yeast and bacteria can be seen, but are appear so similar at this magnification that they really require greater magnification for positive identification.
- 40x -on my scope, I actually have a 43x objective. This means that when I'm looking through the 10x eyepiece and the 43x objective, I am seeing the slide sample at 430 times its actual size. I use this objective to zoom in on potential pathogens I noted when scanning the slide with the 10x objective. I can usually see everything I need to see with this particular magnification. Protozoa, Coccidia, worm eggs & pieces of worms, bacteria, yeast are all easily seen with the 40x objective. I can usually see background bacteria jittering around at this magnification as well.
- 100x -typically anything over 40x is an “oil immersion” lens though on my scope, the 43x is also oil immersion. Oil immersion safe lenses are marked with an infinity sign∞. When using oil immersion, you will not use a cover slip. Instead, you’ll add a drop of specially formulated oil called “immersion oil” to the slide in order to get up close and personal. Some folks choose to use a “dry mount”, then add the oil, others, like me, choose to add the oil to a wet mount that has not had saline added.
Condenser - is the portion of the scope that focuses the light into a tight beam, intensifying it and allowing the beam to illuminate the sample in a very controlled fashion.
Stage - this phrase refers to the “table” the slide will rest on while being viewed.
Mechanical Stage- incorporates a clip that holds the slide fast with the actual table. The slide is then passed under the objectives for viewing using fine tuning knobs on the side of the scope without actually having to move the slide with your hands.
Fixed Stage- has clips to hold the slide, but cannot move the slide horizontally or vertically without physically moving the slide with your hands.
Transformer (also known as Illuminator) - usually external to the scope, the transformer allows you more control over the amount of light passing through the slide by increasing or decreasing the light from the actual bulb via electronic circuit instead of merely via iris.
Immersion Oil– a special transparent oil with a high refractive index that concentrates the light shining through it. When used in combination with an oil immersion lens, allows the viewer to see minute detail of very small particles.
Oil Immersion Lens- a special lens signified by the infinity sign∞. This lens offers optimal resolution when combined with immersion oil.
Focus -
- Coarse - allows you to focus quickly with larger turns of the knob. Generally the coarse focus is the larger knob of two focus knobs on a scope.
- Fine - allows you to hone in on a very specific area in great detail. Generally, the fine focus is the smaller knob of two focus knobs on a scope.
Light- some microscopes come with built-in light sources, others have a mirror to reflect the light from a nearby source. Yet others have a transformer to intensify or decrease light. Light can make a world of difference in what you can and cannot see under the scope. Adjusting your light, in combination with the irises your scope may have, will help you fine tune what you see!
Types of Slide Mounts
There are three kinds of slide mounts typically used:
Wet mount-my preferred method and easiest to use
= Sample + Saline + Cover Slip
Dry or Fixed mount-useful when looking for specific bacteria or pathogens and typically used with stain
= Sample + Heat Source + Stain
Oil Immersion mount-least used here, but useful for determining the exact type of bacteria or protozoa you are dealing with because it is typically used with greater magnification of 1000x or greater
= Dry Mount Sample + Oil + Immersion Oil Objective
NOTE:You must NEVER use immersion oil with objectives that are not made specifically for that purpose (they will have an infinity ∞sign on them), if you use immersion oil with your non-oil objectives, you will ruin them.
Practice Makes Perfect
When first learning to identify pathogens and non-pathogenic items under the microscope, it is important to do a few things FIRST to help you sort out the vast variety of items you may see on a slide. There’s a whole world there to be explored!
Knowing your microscope and how it works is the first step.
If the scope is new to you, practice using it on typical household items and articles like a piece of your own hair or pet hair, sugar or salt granules, fine powdered items like cinnamon or flour. Adjust the light and focus to see how each affects how you see the sample. Manipulate every iris as you adjust the focus. The amount of light you have coming through the sample will make all the difference in the world when it comes to what you will and will not be able to see.
Take a small sample of every food and/or supplement you give your birds and view them under the scope so you will recognize them when you see them in the droppings.
- Look at these items both wet and dry. A single drop of saline solution is often all you need for a slide sample.
If your scope is capable, try both the dark and light field views.
- Adjust the light while focusing. Oftentimes the light intensity will make a huge difference in what you can and cannot see!
- If you have a movable condenser, play with the adjustments.
Get comfortable with your scope BEFORE YOU NEED IT so that when a sick bird situation arises, you are ready.
- Look at each item dry, take note of what you see, then add a bit of saline or distilled water and watch how those items change. Many items, like yeast or spirulina, will “bloom” or expand when liquid is added. For loose and/or powdered items, I choose to place the item in a small bowl, add enough saline to make it watery, and then use a sterile glass dropper to take up enough of the solution to place a single drop on my slide.
- If you have a digital camera, take photographs through the eyepiece and keep the photos for future reference.
Important: Be sure to view everything you’ll use to create your slides as well, such as fuzz from a cotton bud, pieces of toothpick, your saline solution or distilled water, immersion oil, wet newspaper or whatever substrate you use in your cage (it will more than likely stick to the sample as you pick it up and portions will be in your sample!), as well as any stains you may use. Occasionally, bits of these items may show up on a slide and confuse the issue.
Threads or fuzz can look like thread worms, saline and stains can dry leaving crystals on your slide, immersion oil, if not kept sealed and stored properly can pick up bits of sediment and debris, etc.
Try to view everything possible before needing to create a slide to diagnose a sick bird! It will save you heartache and panic in the future!