SETTING UP A BREEDING CAGE
Kristen Reeves, Meadowlark Farms Avian Supply, Inc.
You've created your plan and selected a location, now it's time to choose and set up a breeding cage. A breeding cage is merely an extended version of a regular housing cage with a few exceptions and additions. Use the information here to help you decide what system is best for your own birds, and see how I've set up mine! Also remember, just because it works for me doesn't mean it will work for you! Do what works for YOU!
CAGE TYPE
There are many types of cages available for housing and breeding your birds. You can use a standard wire cage (with the recommended dimensions as described in the cage section of the housing & husbandry page). However, different cage types may work better depending on the location you've chosen to breed your birds.
If your birds will be housed in a well-populated and busy area of your home, a closed-sided cage with only a wire front may work better for you. If your birds have a room to themselves or are housed in an area with little traffic, a simple wire cage will work fine! However, it has been said that Gouldian finches prefer peace and quiet and may abandon their eggs or chicks if disturbed. I have found this to be quite the opposite. If my birds think it is too quiet, they will call for one another and twitter nervously until someone answers! They are more likely to abandon eggs and chicks when they cannot hear and see the other birds! It's really quite amazing after all of the stories I've heard! BUT not all aviaries are the same. Every action of your birds will be dependent on environment. You may have to move your cage around a few times to find just the right spot.
My best producing pairs have never abandoned eggs or chicks, even if I've checked the nest box several times a day! They are accustomed to my hands, the frequent removal of the nest for inspection, the vacuum noise, the cat and the dog, and my children. They produce a good number of healthy chicks each season. Perhaps I have been lucky or perhaps I have been stupid, but the more commotion in the bird room the better my pairs produce! In fact, the chicks of these pairs will often feed their new siblings if left in the cage after the new clutches arrive! Go figure!
NOTE: This behavior is apparently NOT the norm. It is merely MY experience. I would not recommend this type of situation to a novice breeder or one who has kept their birds in a peaceful environment!
ACCESSORIES
As with a regular cage, you may want a second or third set of food dishes, extra water bottles, perches, etc. You will also need something to contain nesting materials such as a wire or plastic salad holder or a mesh bag - the type onions come in. I've also used plastic mesh strawberry crates and even just a clump of nesting material attached to the cage with a clothespin. The point is that just about anything can hold nesting materials as long as the birds can pull the hairs through the container and use them in their nest. “Necessity is the mother of invention!“ - Use what works for you! Some of the accessories you may want to keep on hand include:
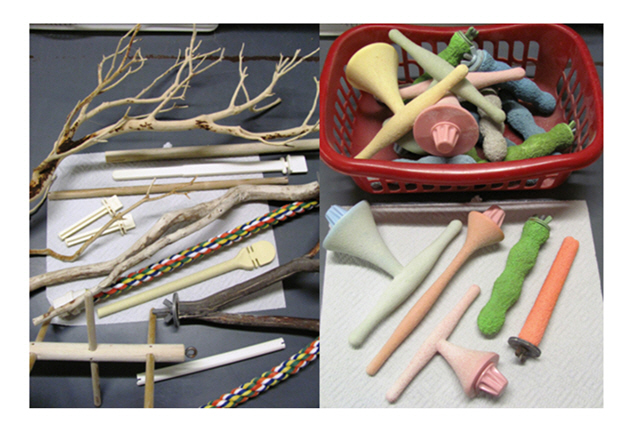
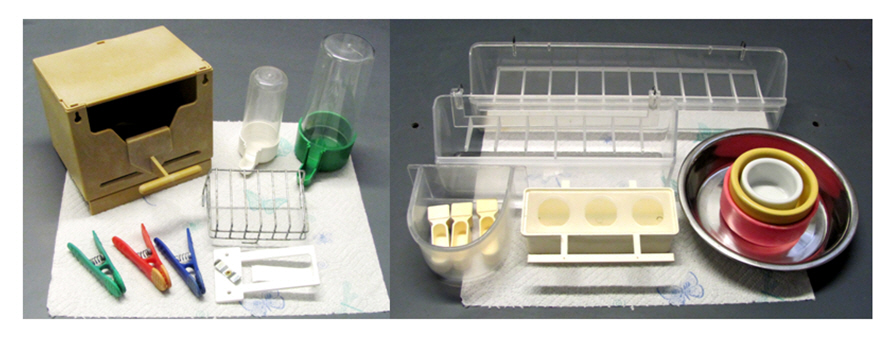
The above photos show just a small portion of what I use in my cages. They work for ME and my birds. Use what works for YOU!
- Additional Perches in varying sizes
- Additional Food & Watering devices - if you use a tube font, be certain your birds have figured out how to use it before removing any standard water bottles!
- Nest Box
- Salad holder or some type of device to hold nesting hairs
- Nesting materials
- Porcelain or Stainless Steel dishes for wet food (egg food, live insects, fruit & veggies), grit, and any other foodstuff. Plastic may be used for dry foods & supplements.
- Cuttlebone clip or wooden clothespins (also come in handy for attaching natural branch perches and spray millet)
- Indoor/Outdoor thermometer and a hygrometer to measure heat and humidity.
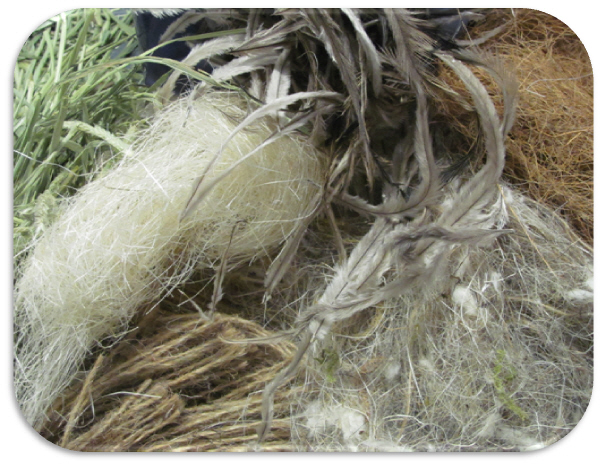
There are many types of nesting hairs you can use as nesting materials for your birds. Alfalfa, Sisal, Jute, Coconut, Feathers or Bermuda Grass are most common - but there are MANY others you can use! Some birds prefer one type over another, some birds aren't choosy, and some won't even use the extra nesting hairs you give them! While I find my Gouldians aren't too picky, I personally prefer a nest lined first with grasses, then with Coco fiber, then with a Cotton-Sisal-Jute-Coconut combination. My birds are currently on an Emu feather kick as their favorite, so you may find your birds prefer one over another! I give them a good pile every kind of nesting material I have available and allow them to choose what they like the best.
Gouldians don't really "make nests" in the wild. They usually breed in tree hollows, hollowed out branches, or take over a parakeet nest. They often only have a few shavings or grasses left in them, so the chicks are often raised in a nearly bare nest. But even so, I always line my nest boxes with nesting material then offer them additional material in a nesting hair holder (wire salad holder).
Some birds go nuts and build more of the nest to their liking, others merely toss the material out or do nothing more than what I've already done for them. You'll have to experiment with your birds!
If you don't want to purchase nesting hairs, you can use clean dryer lint that has no soap residue. I've had many folks ask me if the “perfume“ from dryer sheets affects the birds. I have never had an issue using my dryer lint even when I use dryer sheets or liquid softener in my laundry! But again, this is just my experience! If it worries you, try a different type of nesting material! I've heard of other breeders using tissue, paper toweling and shredded newspaper! If it works for you and your birds like it, go for it! My birds are currently favoring Emu feathers and white chicken feathers.
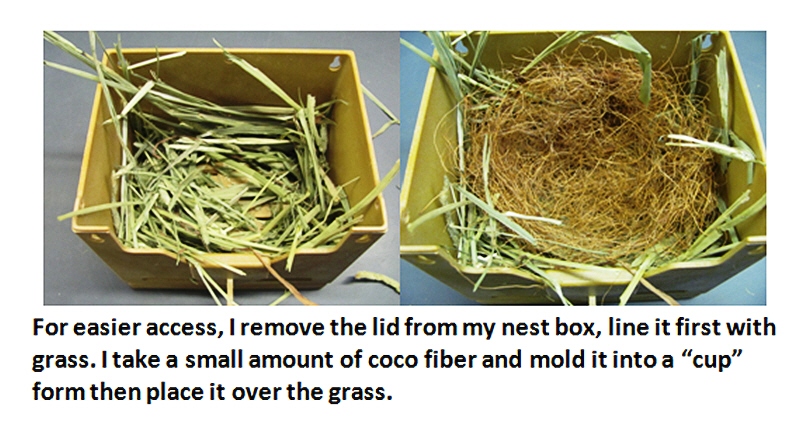
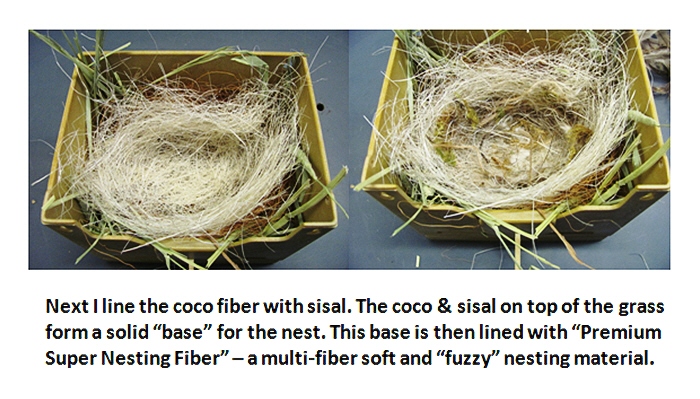
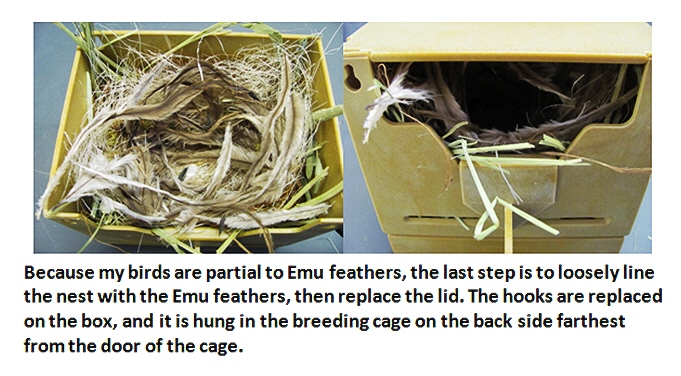
I always place the nesting materials in the basic form of a nest in the nest box. Gouldians aren't the greatest nest builders, so I'm merely helping them out! There are now nest boxes made specifically for Gouldians that are deeper and have a smaller opening - some even have a “porch“. This keeps the birds from tossing their eggs or chicks, but they are more difficult to check when needed so I don't use them. I personally prefer the small, half-open plastic nest boxes - and so do my birds! I don't like wooden boxes because they tend to hold bacteria and parasites. They can't be washed, though they can be disinfected. I've had my plastic boxes for more than 15 years and throw them in the dishwasher after each use. This keeps them impeccably clean and disinfected for the next pair.
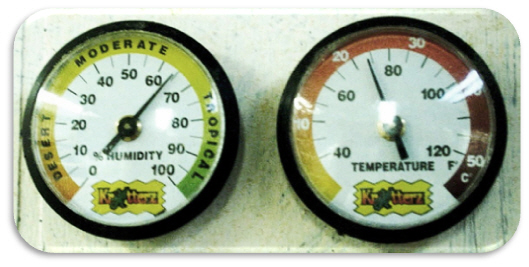
A hygrometer will tell you what your humidity is. The natural humidity in my bird room tends to hover right around 60-65% which is really very high, but my birds are accustomed to it and rarely have issues - though I do monitor their droppings daily and add MegaMix to their water to lower the pH when necessary. Optimal breeding humidity should be somewhere between 35-45% - no higher, no lower.
A thermometer will allow you to track the temperature. I always leave the window open all summer long, so the average temperature ranges anywhere from 68-95 degrees. I prefer to allow the birds to acclimate to the environment as it comes to them. I do not give them additional heat unless the temperature in the bird room falls below 50 degrees. Most winters, the temperature is no more than 68 degrees. Don't let anyone tell you that Gouldians need more heat than that! If a breeder is keeping them warmer, all they are doing is making it so that their buyers will have to keep those birds warm at all times. It does nothing to help them acclimate to the “normal“ temperatures in your bird room. Higher temperatures can also promote yeast and bacteria, so the birds may not be able to fight these issues off on their own. BUT, if you purchase Gouldians from a breeder who keeps them that warm, you cannot just put them in a cooler room. You will need to slowly acclimate them to cooler temperatures over the course of many months.
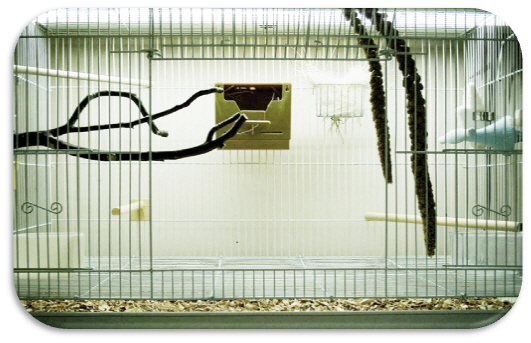
This photo shows one of my 30“ wide breeding cages. Every breeding cage is set up exactly the same with the same number of perches, dishes & drinkers in the same location in every cage. That way, if I need to move birds from one cage to another, they will have no problem finding food or water and know where to perch.
I always place several perches of varying size in each cage, but prefer multi-branched Manzanita to ensure good foot and leg exercise. Fixed sandy perches are placed near the water source - birds tend to wipe their beak after drinking. These perches allow them to keep their beaks & nails trimmed up and cut down on the need for more frequent nail & beak trims.
Food & supplement dishes will vary with the season. During breeding/molting, I always offer one finger treat cup with shaved cuttlebone, one with ePowder and one with FVite. Food and water receptacles are changed DAILY. Perches are changed when soiled.
Why is it so important to change food & water daily -
Fecal matter is the body’s way of voiding toxins and waste products. We don’t drink out of our toilets for a reason – because not only is that just disgusting, but because fecal matter contains bacteria, it could be detrimental to our health! YOU don't eat or drink out of your toilet, so should your birds have to eat or drink out of theirs? If they backwash into their drinker, they are often depositing bacteria or even parasites into their drinking water. You would grab a clean glass and pour fresh water, right? You wouldn’t drink out of a dirty glass or scoop up puddle water and drink it. You don't sit on a park bench covered in bird poop, you cover it with a newspaper or move to another cleaner bench. You avoid stepping in dog poop in the yard to prevent from tracking it into the house, etc.
To avoid illness, humans avoid messes. To keep the birds healthy, especially during times of high stress such as during breeding, we must do what we can to avoid messes in their cages!
CAGE LINER OR SUBSTRATE
On occasion, I use paper OVER the grates to keep the cage bottom clean longer. This photo shows substrate material in the tray. I now use newspaper exclusively because I have a need - a need to "see" the droppings in their actual state so that I can monitor the overall health of my birds on a daily basis.
Something I don’t usually talk about with folks until they’ve sent me dropping photos is the use of NEWSPAPER in the cages. While there are many items that may be used as cage substrate – corn cob, walnut shell, kitty litter, sand, compressed pellets – then paper products such as newspaper, paper toweling, blue pads, computer paper, etc., newspaper tends to be the only one that really reflects the true color and consistency of the droppings.
Why? The various substrates tend to distort and absorb droppings making them almost unidentifiable. The droppings fall in between chunkier substrate pieces and/or get drawn “out of shape” as they fall down between the chunks. The color may also combine with corncob or walnut shell making it look different than it would on plain paper.
PAPER PRODUCTS OTHER THAN NEWSPAPER have bleach and even fragrances in them that will often combine with the urine and urates in a bird’s droppings turning them different colors (usually much more yellow than they would be otherwise, though often pink). What would look almost normal or just slightly “off” on newspaper, will often look like some horrible death warrant on paper towel, blue pads or any other “soft” paper! I’ve had many folks panic when they’ve switched from newspaper over to paper toweling because the droppings changed so dramatically!
LIGHTING
In my aviary, each cage has its own lighting. The lights are on banks of timers set to emulate sunrise and sunset. Lady Gouldians need 13+ hours of sunlight to trigger their breeding instincts. If you use timers on your lights, you can gradually adjust the lighting over time to have them ready to breed when YOU want them to breed! I begin to adjust my birds for the breeding season about mid-October when I start to add an hour to their light every three days or so.
By mid-November to early December, the birds are getting their full 13 hours of light, hence triggering their breeding instinct. My timers are set so that each timer goes on within 15 minutes of each other. During breeding season, the first bank of lights comes on at 4:15 a.m., the rest come on at 4:30 and 4:45 a.m. They begin to go off at 6:00 p.m., again at 15 minute intervals. These settings allow the birds to wake up slowly, and at night, find a place to roost without going to total darkness all at once.
Near the end of June to mid July, I being to change the timers so that one goes off 1/2 hour sooner, while the rest stay the same until I've brought them down to a consistent 12 hour day. The fewer hours of light also tell the birds it is time to molt though they often begin their annual molt within a week or so of me removing the nest boxes. They will then begin the cycle all over again as the rich breeding foods are removed until October 1st and when the lights are timed to prepare them again!
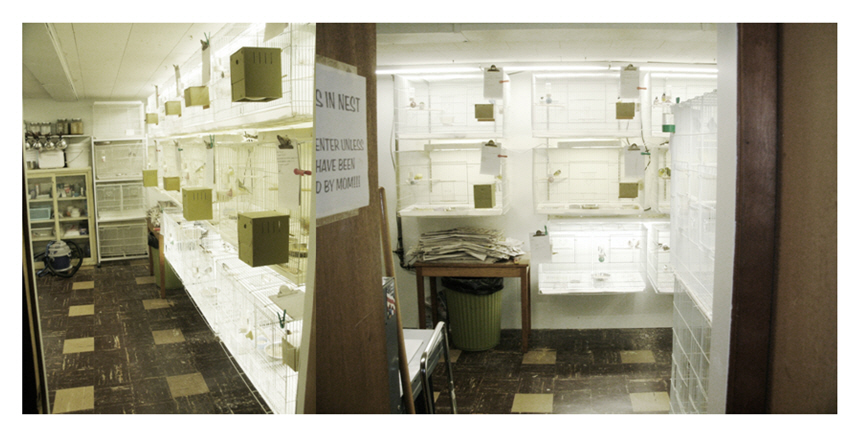
My bird room has changed significantly MANY times since this photo was taken, and will continue to change as I add birds or figure out a better way to set it up - I'm all about efficiency! But these photos give an idea of how close the cages are to a portion of my breeding and flight cages. They are very near one another allowing the birds to see and hear each other. The proximity seems to give them a sense of safety.
Notice how the cages are hung on the wall. This makes cleaning up seed and feathers a cinch! I have used plain metal shelving brackets, dividing the length of the cage over 4 brackets. The cages are literally hung on them. I used to use a second set of brackets under the cage trays for extra support, but have since discovered these were unnecessary.

Larger cages are also bolted to the wall through the brackets with screws and washers. This keeps them from tipping forward when I pull the trays for cleaning. The large flights shown house juveniles from the current year - separated by sex.
You'll also want to keep the items included on the You Have Eggs and When the Chicks Hatch pages on hand! Also see Optional Equipment for additional items you may want or need.
Please keep in mind that the above setup is just what works for ME! I have kept large walk-in aviaries only to lose control of my breeding stock. I've used solid sided cages but found them too difficult to keep clean – I’ve found this room and setup to work best for ME and MY birds and helps expedite cage cleaning.
You have to make your setup work for YOU! Don't be afraid to try new things, and if you have questions, send me a note! I'll be happy to try to walk you through any difficulties you may come across! ~k


